Don't miss even a single update! Like/Join us on Facebook to keep up-to-date!

Categories...

Kedai Membaiki Komputer

Kedai Membaiki Komputer
Dipercayai, Berkualiti & Pengurusan Mudah!
Showing posts with label Tutorial. Show all posts

Tuesday, 16 June 2015

How To Create Typography Illustrations the Easy Way

Read the article
Hand lettering typography illustrations are really cool, but it takes a lot of skill to craft authentic artworks by hand with pen and paper. Typically this style of art is created by elite illustrators, but I’ve found an entirely digital technique that allows us mere mortals to create cool looking artwork too! Follow this step by step Illustrator tutorial to learn how to manipulate text within a silhouette shape and add texturing to produce a realistic hand drawn style typography illustration.

Hand lettering style typography illustration
After releasing last week’s free meat cut illustrations I received a few enquiries from people asking how they were made, so today’s tutorial is based on the same technique. We’ll be creating a trendy hand lettering style quote illustration, except with this method there’s no hand lettering required! Usually this artwork would be carefully hand drawn and scanned, but instead we’re going to cheat and use digital techniques to safely tweak the text until we’re happy then fake that analogue look with textures.

The quote I’ve chosen to depict in this typography illustration is “Give Me a Home Where the Buffalo Roam” from the classic Home on the Range song, so an image of an actual buffalo suits this quote perfectly. I’m using this public domain image as a reference. Paste in your reference image and reduce the opacity to around 50%.

Select the Pen tool and begin tracing a rough outline around the subject. Accuracy isn’t too important because we’re trying to replicate a hand drawn style. Once the path is complete, add a black fill and remove the stroke.

Type out your chosen quote somewhere on the artboard, then scan through your fonts collection for a nice hand drawn style. I’m using a premium font named Daft Brush, but here’s a roundup of loads of free handwriting fonts you can choose from. Create individual text elements for each word of the quote, fill them with white and place them over the silhouette image.

Begin scaling and rotating the text elements to roughly fit them within the silhouette image. Make sure the primary words are made the largest in size so the quote is easily readable.

What our digital design is lacking that those hand lettered example have is the free flowing shapes of the text. The hand lettering illustrators will draw the words to match required shape, but it takes some skill to plot the letters so they fit perfectly. Instead we can use the Envelope Distort tool to manipulate and tweak the shape of our text until we’re happy. Select the first word and go to Object > Envelope Distort > Make with Mesh.

Add just one row but select a number of columns roughly equal to the number of letters in the word. The more columns there are the more the word can be reshaped, which is important for those words that need to fit into complex areas.

Use the Direct Selection tool to select each point of the mesh and move it into place to manipulate the text into the shape of the silhouette outline. Don’t forget to adjust the bezier handles to generate smooth curves.

Shorter words don’t require as many mesh points because they’re smaller in size. Make just 2 columns for a two letter word.

Some words will require some considerable manipulation to distort them into the required shape. Move those mesh points around to stretch the letters, but try to keep each column of the mesh equal in size so the letters are still evenly spaced.

For words on the second line the mesh points will need manipulating on the top and bottom so the word follows the flow between the existing text and the silhouette outline.

Aim to fill as much of the silhouette shape as possible but retain even gaps around the edges and in between each word. The great thing about designing digitally is you can move and tweak the letters until you’re happy. Whereas, whatever you draw by hand is permanent!

One advantage of authentically hand drawn artwork is the natural texturing that is generated from the ink or lead. We’ll need to fake this on our digital artwork. Add an Opacity Mask to the silhouette shape from the slide out menu from the Transparency panel.

The opacity mask will create a black square inside the Transparency panel to represent the mask contents. Select this square to activate the mask, then paste in a texture from my Vector Textures pack. Deselect the Clip option and select the Invert Mask option, then reactivate the normal artwork by clicking the left hand square in the panel.

Make a group out of all the text elements then add a new Opacity Mask and paste in another texture to erase away tiny areas of the text too.

Finishing touches


The vector design is complete, but a few extra steps to mock up the design will really finish it off. Open a complementing photograph in Photoshop and apply one of my RetroFilter Actions to add an interesting colour adjustment.

I’ve chosen the “Molle” Action then reduced the opacity to around 75% to allow some of the original colours to show through.

Paste in the vector artwork from Illustrator and press CMD+I to invert the colours. Change the blending mode to Screen to render the black text transparent and effectively punch out the text from the silhouette.

We’ve already added some vector texturing in Illustrator, but Photoshop allows for much more realistic edits. Create a Layer Mask, ALT-click on the layer mask thumbnail to activate it then paste in a texture file. Here I’m using one of the vintage textures available to Access All Areas members.
Hand lettering style typography illustration
The final design has all the characteristics of authentic hand drawn art, but it didn’t require the perfection and patience that’s necessary with pen and paper. The manipulation of the text also helps disguise the fact that it’s a display font; warping the letters means that no two letters look identical. The greatest benefit of this digital technique though, is that the text can still be edited and the new wording will automatically form to the existing shapes.

Original Article: http://blog.spoongraphics.co.uk/tutorials/how-to-create-typography-illustrations-the-easy-way

Thursday, 4 June 2015

How to Create a Software RAID Array in Windows 7


Instead of having a bunch of separate drives to deal with, why not put them together into one big drive? You can use software RAID to accomplish this, and here’s how to do it.

Windows has built in functionality to set up a software RAID (Redundant Array of Inexpensive Disks) without any additional tools. This makes it easy to turn your existing spare hard drives into massive storage or even redundant backups. In this example we are going to set up a spanned disk that takes three 2 GB disks and creates one 6 GB disk using Windows 7 Professional.

Set Up Your Disks


The first step you need to do is backup your information on the disks you want to use in the RAID. While it is not required that you format your disks for some of the RAID options, don’t take the chance and make a backup.
Once all of your information is backed up, open your start menu, right click on computer and open manage.

When computer management opens click on disk management on the left side. Any disk you want included in your RAID you need to delete them from the top area of disk management.

Once they are deleted you should only be left with disks you do not want included in the RAID. The other disks will still be there but they will show up in the lower pane and show their spaces as unallocated.

Create Your RAID

In Windows they don’t call their RAID options by the traditional 0, 1, 5, 10 etc. Instead they use spanned, striped, and mirrored as the options for creating software RAIDs.
Note: RAID-5, although one of the options, isn’t actually available in Windows 7 due to licensing issues. Thanks to the commenters for pointing that out.
A spanned volume will create a single partition that will literally span all of the included disks whereas a striped volume will deliberately break up files across multiple disks in an attempt to improve read and write performance. In both cases there is no redundancy so you need to create your own backups.
A mirrored volume and RAID 5 both have some redundancy but you lose storage space to create the parity files needed for recovery. For this example we are going to go with the simplest volume type and create a spanned volume even though it isn’t technically RAID.
Right click on the first disk you want included in your RAID and select new spanned volume.

This will open up the New Spanned Volume Wizard in Windows. Click next and then select which disks you want included in your new volume (a.k.a. software RAID).

Assign the new volume a mount letter or mount point.

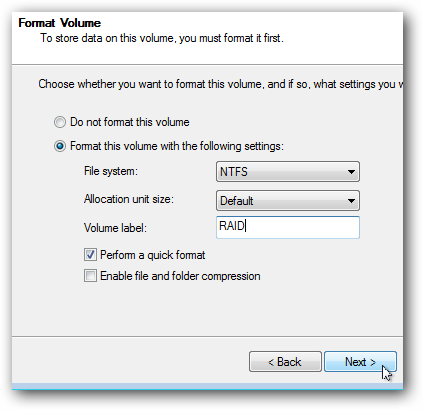
Name and format the volume and click next.

The final step just reviews all of your settings before the disks are formatted and the new volume is mounted.

You should also receive a warning letting you know that if your operating system is on one of these volumes you won’t be able to use it because the volume is now a dynamic volume instead of a logical volume.

Finally the disks will be formatted and once the drive is mounted you should be welcomed with the familiar AutoPlay prompt.

If you browse to Windows explorer you should also see that the new volume has the combined storage space of the three individual disks used to create it.

credited to HowToGeek

Saturday, 1 November 2014

Your iPhone 6 battery charge draining fast? TRY THIS!

Possible Cause by percentage...

This is How to Preserve Battery Life on iPhone 6 Running iOS 8

I will make this simple... but if you wondering why, there are explanations at the bottom of this entry.
:)


1. Turn off any location-tracking applications.
2. Control notification widgets.
3. Turn off Handoff.
4. Stop fetching   
5. Find out what is draining the battery, and kill it! 
 :)

Explanation:

1.  You don’t always need to be tracked. iOS 8 now allows users to choose a “While Using” option for certain apps (like Facebook).

Navigate to Settings > Privacy > Location Services. You can still leave on Find My iPhone from this menu. Go to Settings > Privacy > Location Services > Share My Location, to turn off another battery draining feature. You just have to remember to turn it back on if you want to use this feature again. Turning off Wi-Fi from the Settings menu, will also save your battery. You don’t need wifi if you are not using your phone.

2. Accessing the Notification Centre is easily done by pulling down the menu from your top screen and customising your ‘Today’ view. Select which widgets you want to keep and which ones you can live without by tapping the ‘Edit’ button. Alternatively, you can navigate to Settings > Notifications and turn off  notifications from apps. 

3. If you are not planning on using two devices at the same time, you don’t need to run Handoff. Go to Settings > General > Handoff & Suggested Apps.

4. Fetching allows email notifications to go to your home screen. If you are not bothered about this function, turn it off by going to Settings > Mail, Contacts, Calendars > Fetch New Data.

5. One of the latests updates in iOS 8, allows users to see a rundown of what apps use the most power. Go to Settings > General > Usage > Battery Usage to find out which apps are using the most power in the last 24 hours. Simply close the apps or delete the ones you no longer need. This will only work if your phone has been running for a few days as it needs enough data to use.

HOPE THESE HELPS!


For more Info, please visit and LIKE Facebook page: SABAH TECHNOLOGY <<< click here

Saturday, 25 October 2014

Isu video seks palsu UAI, mesti tonton video CARA EDIT MUKA DALAM VIDEO


Susulan penyebaran satu video seks palsu Ustaz Azhar Idrus bersama seorang wanita, media sosial kini dipenuhi berita mengenai pendakwah terkenal itu.

Bagaimanapun, orang ramai percaya video yang tersebar itu telah di-edit semata-mata untuk memburukkan nama Ustaz Azhar.

Memandangkan video amat sukar untuk diedit, kerana itulah kamu perlu tonton video di bawah.


Tekniknya memang menakjubkan bukan?

Tapi jika teknologi ini digunakan untuk tujuan yang buruk, maka ianya boleh membawa bencana yang besar kerana ramai akan percaya dengan video berbanding gambar yang lebih mudah untuk disunting.


Note: Anwar Ibrahim juga menjadi mangsa 'doctored video'


For more Info, please visit and LIKE Facebook page: SABAH TECHNOLOGY <<< click here

Friday, 17 October 2014

How To Sign The Online Petition of Calling Sabah Sarawak Rights (SSKM)


In other name this petition is called 'SABAH SARAWAK KELUAR MALAYSIA'

In case any of you doesn't know how to 'sign' it, here is the tutorial... i make it as simple as i can...

Firstly, this link will direct to the GENUINE petition (various clone claimed itself the official/original)--> http://www.gopetition.com/petitions/sabah-sarawak-rights.html

This is the main page for SSKM petition.


Pls click 'sign the petition' button...


You will reached this page after you hit the button at the main page. Now, pls scroll down to continue... and you will see a form which need to be filled..


1. Mr for Male, Ms for Female

2 & 3. Let say your name is David Palmer, then your first name must be David, and 'Palmer' will be your last name.

4. If you don't have any e-mail account, pls create one. G-mail are the easier one to create. I recommend it.

5 & 6 Let say you live in Matunggong Kudat, then just put 'Matunggong' in the blank. And put 'Kudat' as the City.

7. Sabah or Sarawak

8. If you don't know your postcode area is. google it!

9. Click it and you scroll down the list until you find Malaysia. Hit the 'M' button may help you jump alphabetically.. 


12. Right there, 'Spiro Spero' is my friend. He signed this petition and told me about all these.

13. If you are SSKM volunteer, you maybe sign this petition for other people. It's OK.

14. Put your comment... if you have something to say to UN Chief: Ban ki moon, go forward... mention his name in your comment.. but please mind your words~

15. This is the security to make sure you are not a malware bot which programmed to sign the petition. If you are not, then type in what you see...

16. you at the last step... make sure all the information you gave is correct.. check your spelling and so on. Hit the SIGN button after you double-checked it.

HOORAY!! You did the right thing!
 

Wednesday, 15 October 2014

Cooling System Modification (Laptop)


# Laptop's Cooling System Modification

Kalau kamu betul2 syg laptop kamu dan ada budget lebih. Pergilah modify cooling system (fan bypass) laptop kamu. Why?

Coz di dalam laptop kamu ada dua processor. Processor pertama dipanggil 'cpu'. Cpu ni yg kita panggil intel pentium, intel i3, i5 i7, amd sempron, amd athlon x2 dan sebagainya. Dan processor yang ke-2 dipanggil gpu. Kalau laptop kamu guna nvidia or ati graphic.. itu lah yg dipanggil gpu. Gpu memproses apa yang kita nampak pada monitor screen.

CPU = central processing unit
GPU = graphical processing unit

Cpu & Gpu berkongsi satu cooling fan. Kita bayangkan cooling fan terletak di tengah2 antara cpu dan gpu. Bila CPU bnyk berkerja, contohnya copy files dari pendrive ke dalam computer dan sambil mendengar mp3, cpu akan lebih cepat panas, maka heat sensor yg berada berdekatan dgn cpu dapat mengesan haba dari cpu lalu sensor itu sendiri juga akan menghantar signal kepada cooling fan. Signal ini akan trigger kipas supaya berpusing dan sekaligus menyejukkan cpu dan gpu.

Namun bila kita banyak menggunakan software yang melibatkan penggunakan grafik seperti menonton movie atau bermain game, kita lebih banyak menggunakan gpu berbanding cpu. Oleh itu, gpu berkerja lebih kuat dan menghasilkan haba. Di sini masalah akan timbul kerana tidak ada sensor yang dikhaskan untuk mengesan haba kepanasan yg dihasilkan oleh gpu tadi. Oleh itu kipas tidak akan berpusing untuk menyejukkan gpu. So gpu terpaksa bergantung pada cpu.., berharap cpu juga turut panas agar sensor yg berdekatan dgn cpu menghantar isyarat pada cooling fan supaya mula berpusing. Dengan itu cpu dan gpu bersama-sama dapat disejukkan.

Let say, sensor tidak berfungsi... atau cooling fan itu sendiri yang tidak berfungsi:

- Laptop akan mati jika cpu mencapai darjah kepanasan tertentu. Kerana cpu akan auto-off secara automatik bila darjah kepanasan tertentu tercapai.
- Tapi gpu tidak akan mati secara automatik hinggalah gpu BURNT. Kita hanya akan sedar masalah ini selepas next-restart.

Ini lah masalah yg kerap berlaku pada kebanyakkan laptop. Simtom kerosakkan gpu ialah: laptop boleh on tapi tiada display dan cuma blinking lights pada keyboard.

So langkah utk mencegah kerosakkan gpu ialah dgn bypassing fan. Setelah modify, fan akan mula berputar sebaik sahaja laptop on dan akan sentiasa berputar tanpa perlu menunggu cpu atau gpu panas (sensor disabled). Ini sekaligus menambah-baik performance cpu dan gpu kerana sentiasa sejuk. Ini juga akan menambah life span cpu dan gpu kamu. KALAU laptop kamu sepatutnya bertahan selama 5tahun tanpa kerosakan, dgn modify fan laptop cara ini, laptop kamu akan bertahan selama 7-8tahun berbanding 5tahun tadi.

Sebelum modify fan tadi, habuk perlu dibuang habis dari heatsink dan motherboard. Selain daripada itu, fan bypassing sepatutnya disertakan sekali dgn thermal pad replacement pada cpu dan gpu. thermal pad ini seperti chewing gum yg dipasang di atas cpu dan gpu. Thermal pad berfungsi untuk menyerap haba panas dari cpu dan gpu dan mengalirkan haba panas tersebut kepada heatsink (melalui heatpipes). Kebanyakan kilang pengeluar melekatkan thermal pad yang kurang berkualiti: mudah keras. bila ianya menjadi keras, ia tidak akan dpt menyerap haba lagi. sebab itu ianya perlu ditukar sekurang-kurangnya 6 bulan sekali.

Bawa lah laptop kamu ke mana2 kedai yg boleh membaiki motherboard dan minta kedai tu modify. Saya kurang pasti dengan harga di kedai lain. Tapi harga di kedai Prodigy-Sabahtech - RM50-80.

=-=-=-=-=-=-=-=-=-=-=-=-=-=-=-=-=-=-


Call/sms/whatsapp: 016 - 83 44 161

Alamat Premis:

PRODIGY-SABAHTECH
(signboard: CKV Cuci Gambar),
Tingkat 3 Wawasan Plaza (berdepan food-court),
Kota Kinabalu.
(bersebelahan dengan terminal bas wawasan)

& Indah Permai, Sepanggar.

Operation hours:
- 11am-8pm (ISNIN, RABU & JUMAAT) - Wawasan Plaza, KK.
- 11am-8pm (SELASA & KHAMIS) - Indah Permai, Sepanggar.
- SABTU TUTUP
- Ahad untuk appointment sahaja. Sila call/sms pada isnin-jumaat untuk membuat temujanji pada hari ahad.

#Sabah #Technology #Malaysia #KotaKinabalu #Computer #Services #AutoOff #AutoRestart #GPUreplacement #CPUreplacement #Chipset #Laptop #Fan #Bypass #Modification


Motherboard Cleaning (Laptop)


Bila kali terakhir kamu 'service' laptop kamu? Setahun yg lepas? Atau tidak pernah langsung?

Habuk yang ada di dalam laptop kamu akan kelihatan seperti dalam gambar.

Antara sebab utama punca kerosakkan motherboard ialah bila haba panas di dalam laptop tidak dapat ditiup keluar oleh kipas kerana lubang2 pada heatsink sudah tersumbat (lihat gambar). Maka itu, beberapa komponen penting seperti chipset, cpu dan gpu akan rosak akibat dari masalah 'over-heated'

Servis laptop kamu sekurang-kurangnya 4-bulan sekali, bergantung pada tempat kediaman. Kalau tinggal di kawasan yang berhabuk, contohnya rumah yang terletak di tepi jalan raya atau berdekatan dengan construction site, penjadualan servis sepatutnya lebih kerap.

Servis yg dimaksudkan di sini ialah:

1. buang habuk di keseluruhan dalam laptop
2. tukar thermal pad & tambah thermal paste

Utk servis buang habuk & tukar/tambah thermal tu cuma RM35. Janganlah berkira sangat. Kalau motherboard rosak, kos utk repair mencecah RM280!

Motherboard Cleaning hanya RM40.

Motherboard Cleaning + Reformat + Data Backup + Tweaks = RM70

=-=-=-=-=-=-=-=-=-=-=-=-=-=-=-=-=-=-


Call/sms/whatsapp: 016 - 83 44 161

Alamat Premis:

PRODIGY-SABAHTECH
(signboard: CKV Cuci Gambar),
Tingkat 3 Wawasan Plaza (berdepan food-court),
Kota Kinabalu.
(bersebelahan dengan terminal bas wawasan)

& Indah Permai, Sepanggar.

Operation hours:
- 11am-8pm (ISNIN, RABU & JUMAAT) - Wawasan Plaza, KK.
- 11am-8pm (SELASA & KHAMIS) - Indah Permai, Sepanggar.
- SABTU TUTUP
- Ahad untuk appointment sahaja. Sila call/sms pada isnin-jumaat untuk membuat temujanji pada hari ahad.


#Motherboard #Cleaning #Service #Dust #Thermal #Clogged #Overheat #Hot #Maintenance