Instead of having a bunch of separate drives to deal with, why not
put them together into one big drive? You can use software RAID to
accomplish this, and here’s how to do it.
Windows has built in functionality to set up a software RAID
(Redundant Array of Inexpensive Disks) without any additional tools.
This makes it easy to turn your existing spare hard drives into massive
storage or even redundant backups. In this example we are going to set
up a spanned disk that takes three 2 GB disks and creates one 6 GB disk
using Windows 7 Professional.
Set Up Your Disks
The first step you need to do is backup your information on the disks
you want to use in the RAID. While it is not required that you format
your disks for some of the RAID options, don’t take the chance and make a
backup.
Once all of your information is backed up, open your start menu, right click on computer and open manage.
When computer management opens click on disk management on the left
side. Any disk you want included in your RAID you need to delete them
from the top area of disk management.
Once they are deleted you should only be left with disks you do not
want included in the RAID. The other disks will still be there but they
will show up in the lower pane and show their spaces as unallocated.
Create Your RAID
In Windows they don’t call their RAID options by the traditional 0,
1, 5, 10 etc. Instead they use spanned, striped, and mirrored as the
options for creating software RAIDs.
Note: RAID-5, although one of the options, isn’t actually
available in Windows 7 due to licensing issues. Thanks to
the commenters for pointing that out.
A spanned volume will create a single partition that will literally
span all of the included disks whereas a striped volume will
deliberately break up files across multiple disks in an attempt to
improve read and write performance. In both cases there is no redundancy
so you need to create your own backups.
A mirrored volume and RAID 5 both have some redundancy but you lose
storage space to create the parity files needed for recovery. For this
example we are going to go with the simplest volume type and create a
spanned volume even though it isn’t technically RAID.
Right click on the first disk you want included in your RAID and select new spanned volume.
This will open up the New Spanned Volume Wizard in Windows. Click
next and then select which disks you want included in your new volume
(a.k.a. software RAID).
Assign the new volume a mount letter or mount point.
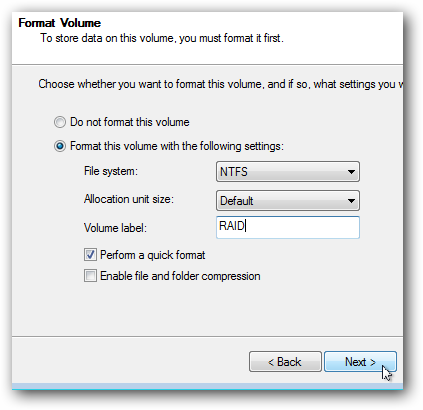
Name and format the volume and click next.
The final step just reviews all of your settings before the disks are formatted and the new volume is mounted.
You should also receive a warning letting you know that if your
operating system is on one of these volumes you won’t be able to use it
because the volume is now a dynamic volume instead of a logical volume.
Finally the disks will be formatted and once the drive is mounted you should be welcomed with the familiar AutoPlay prompt.
If you browse to Windows explorer you should also see that the new
volume has the combined storage space of the three individual disks used
to create it.
credited to HowToGeek